Did you know that you can access your SharePoint content via Rulex Platform?

Entry posted by Silvia in Development
535 views
Having all your important documents scattered across different folders and devices is a headache, and you probably use a centralized platform like SharePoint for storing, organizing, and managing them anywhere, anytime.
But what if you could take that efficiency even further? Rulex Platform streamlines the process of accessing and working with SharePoint data within its environment.
Just follow these simple steps to register your SharePoint app for Azure authentication and connect it to Rulex Platform.
Prerequisites:
An Azure tenant subscription (the tenant ID will be requested).
Possibility to obtain admin consent on the permission of the created
application.
Procedure:
-
1. Open the Microsoft 365 admin center using the account of a user
member of the Tenant Global Admins group.
-
2. Click on the Azure Active Directory link, available under the
Admin centers group in the left-side tree view of the Office 365 Admin Center. In the new
browser's tab which will be opened you will find the Microsoft Azure portal.
-
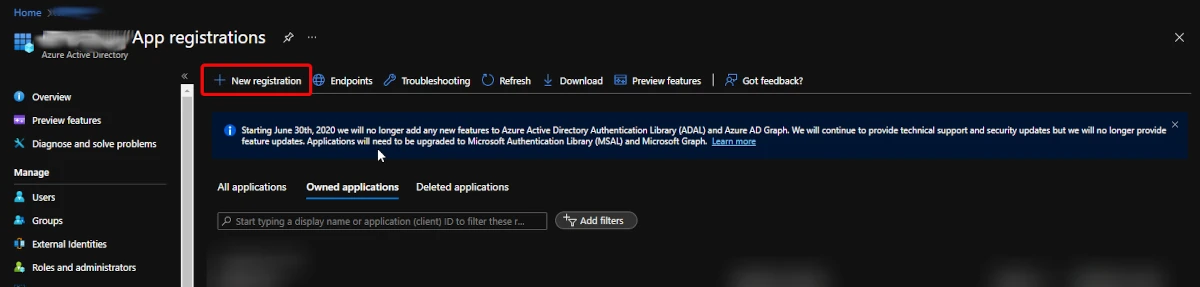
3. On the portal just opened select the Azure Active Directory section and
choose the option App registrations.

-
4. In the App registrations tab you will find the list of Azure AD applications registered in your tenant. Click the New registration button in the upper left part of the blade.
-
5. Next, provide a name for your application and click on Register at the bottom of the blade.
-
6. Click on API permissions in the left menu bar and click on the
Add a permission button.
-
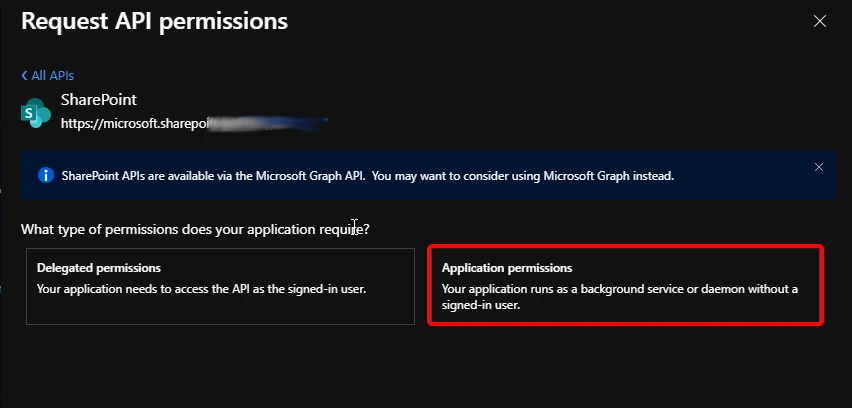
7. Here you choose the permissions you will grant to this application.
-
8. Select Application permission. Then Sites.Selected or Sites.FullControl.
-
9. Click on the blue Add permissions button at the bottom to add the permissions to your application.


On the Overview page you can see the Client ID, the Client App name and the Tenant ID of your application. On the page Certificates & secrets you can also create a Client Secret useful for some extra steps, listed below.
If the Sites.Selected option was selected in the previous configuration, you need an extra step to configure in the application the Sharepoint sites your application has access to. To configure this step you need:
Prerequisites:
A software to execute REST API call (the guide uses Postman).
An Administrator Azure AD application created with the steps before but
with
Sites.FullControl permission. Please take note of the Client ID and the
Client Secret of this application as you are going to use them in a while.
The configuration of the Sites.Selected permission works as follows:
-
1. Execute the following REST API call:
-
Request Method:
POST -
Request Url:
https://login.microsoftonline.com/<Tenant ID>/oauth2/v2.0/token -
Request Header:
Content-type: application/x-www-form-urlencoded -
Request Body:
-
grant_type :
client_credentials -
scope :
https://graph.microsoft.com/.default -
client_id :
<Client ID of your Admin Azure AD app> -
client_secret :
<Client Secret of your Admin Azure AD app>
-
grant_type :
-
Request Method:
-
2. From the response, keep the access_token, which can be found in the
corresponding field. It is going to be used for granting roles.
-
3. Now you need to gather the Site ID for the sites you want to add to the
permission.
To do it open in the browser the following URL: https://<domain>.sharepoint.com/sites/<site_name>/_api/site/id where domain and site_name should be substituted with your Sharepoint Domain and with the name of the Sites you want to add to the Sites Selected permission list.
-
4. Execute for each Site ID you want your Site Selected app to be granted to, the
following REST API call:
-
Request Method:
POST -
Request Url:
https://graph.microsoft.com/v1.0/sites/<Site ID>/permissions -
Request Header:
Content-type: application/json - Request Body:
-
Request Method:

	{
	"roles": ["write"],
	"grantedToIdentities": [{
	"application": {
	"id": "<Client ID of your Site Selected App>",
	"displayName": "<Client App name of your Site Selected App>"
		}
	}]
}
Connecting a certificate to the application
The final step is to connect a valid certificate to the just created application with the correct permission to evaluate a Signed JWT to be used in Rulex Platform Software.
Prerequisites:
A certificate or a tool to create self-signed certificate and inspect
it (the guide use
Powershell to create it and openssl to inspect it).
A node.js console to
execute a javascript procedure.
A valid certificate for your app. You can use a signed
certificate for your app or a
self-signed x509 certificate. You can create a self-signed x509
certificate using for example Powershell and the following code.
$cert = New-SelfSignedCertificate -certstorelocation cert:\localmachine\my -dnsname stantest.com
$pwd = ConvertTo-SecureString -String '123456' -Force -AsPlainText
$path = 'cert:\localMachine\my\' + $cert.thumbprint
Export-PfxCertificate -cert $path -FilePath <path of your pfx file> -Password $pwd
To finalize your application creation, you can follow the procedure below:
-
1. Upload the certificate to the Certificates & secrets page of your
just created app. During the upload please take note about the Thumbprint code assigned by
Azure to your certificate.
- 2. If you do not have already (for example if you use a signed certificate), run the following command to create from the pfx file the cer, the pem and the key version of the certificate:
-
openssl pkcs12 -in <path of .pfx file> -clcerts -nokeys -out <path of .cer>
openssl pkcs12 -in <path of .pfx file> -nocerts -nodes  -out <path of .pem file>
openssl rsa -in <path of .pem file> -out <path of .key file>
-
3. Install with npm (the node.js package manager) the following package jsonwebtoken:
npm install jsonwebtoken.
- 4. Run the following script in node.js to create the JWT token necessary for the authentication based on the certificate just created. Before running you need to insert in the written position the following information about your just created app (Tenant ID, Client ID of the app, Thumbprint of the certificate taken before, path to the key version of your certificate):
-
var jwt = require("jsonwebtoken");
var fs = require("fs");
var uuidv1 = require('uuid/v1');

var tenant = "<your tenant ID/Name>";
var clientID = "<your Azure AD app ID>";
var certThumbprint = "<.cer Thumbprint value on Azure portal>";
var privateKey = fs.readFileSync("<path of your .key file>").toString();

var certOctets = certThumbprint.match(/.{1,2}/g)
var certBuffer = Buffer.alloc(certOctets.length)
    for(var i=0; i<certOctets.length; i++){
        certBuffer.writeUInt8(parseInt(certOctets[i], 16), i);
    }
//Perform base64url-encoding as per RFC7515 Appendix C
var x5t = certBuffer.toString('base64').replace(/=/g, '').replace(/\+/g, '-').replace(/\//g, '_');


var current = Date.now().toString().substr(0,10);

var payload=
{
    "aud":"https://login.microsoftonline.com/"+tenant+"/oauth2/token",
    "exp": Number(current) + 31536000,
    "iss":clientID,
    "jti":uuidv1(),
    "nbf":Number(current),
    "sub":clientID
}
var token = jwt.sign(payload,privateKey,{algorithm: 'RS256',header: {"x5t": x5t}})
console.log(token)
-
5. With the previous code the obtained token lasts one year, and can be used in Rulex
Platform as Azure Authentication password for one year. Change the number
31536000with the desired validity time in seconds to change this behavior.
-
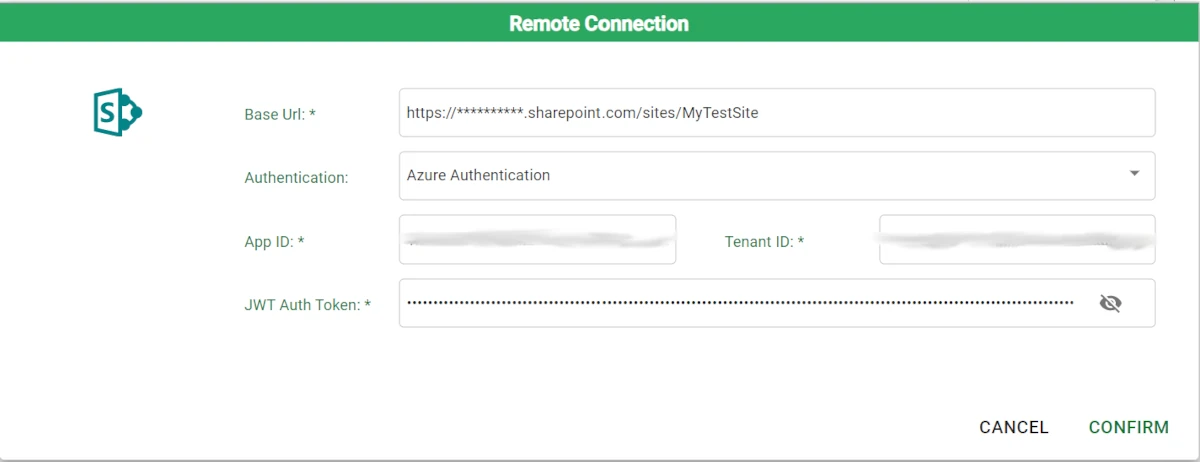
6. To use this configuration in Rulex Platform you need to set the type of authentication
to Azure Authentication instead of Legacy Sharepoint Authentication, and to enter the following
information:
- App ID: the Client ID of the Azure application created.
- Tenant ID: the Tenant ID of your Azure subscription.
- JWT Auth Token: the token just printed on the node.js console in the step before.

-
 1
1

0 Comments
Recommended Comments
There are no comments to display.