Did you know that you can access Google Drive via Rulex Platform?

Entry posted by Silvia in Development
450 views
Rulex Platform allows users to access the content of Google Drive by connecting to Google REST API service. Google Drive efficiently supports storage of files and folders, you can easily access them via Rulex Platform and use Rulex Platform's advanced data analytics tools.
This connection allows you to leverage the combined functionalities of both platforms for your data management and analysis needs. Below the step-by-step procedure explains how to establish this connection between Rulex Platform and Google Drive.
At the moment, Rulex Platform supports the OAuth 2.0 refresh token authentication only. So, it requires a refresh token to be used to issue an access token at any call.
Prerequisites:
An account with Google cloud console access.
A software to execute REST API call (to obtain the refresh token);
we are going to use Postman in this guide.
Procedure to create a new project inside the Google cloud environment
- Go on the Google Cloud Console.
- Log in with your Google account.
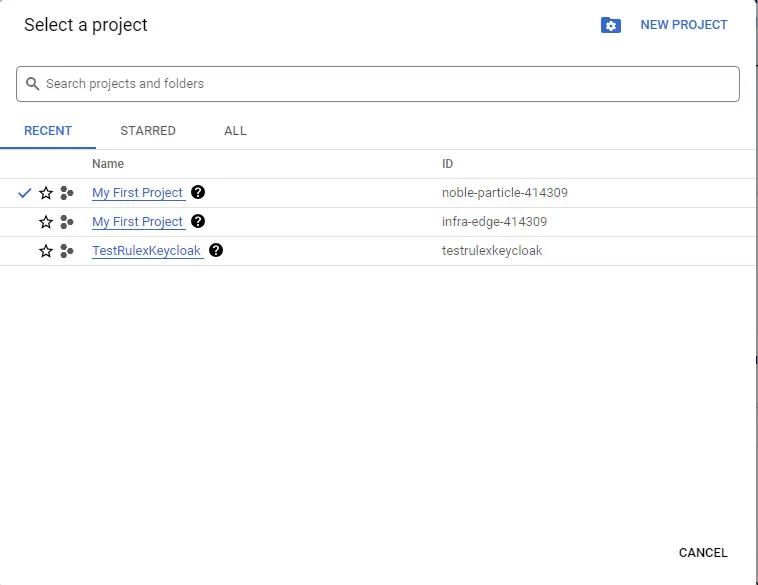
- Select from the drop-down menu on the top side of the dashboard Select a project.
- Click on New project and follow the next steps to create it.
Procedure to enable Google Drive APIs to allow the new application to access the service
- Once the newly created project is selected, click on the Menu icon in the top left corner of the screen and go on the API & Services and then Enabled APIs and services.
- If you haven't any enabled API yet, click on Enable api and services at the top of the screen.
- Search Google Drive API, select it and click Enable.
- Go on the Credential tab by selecting it from the list on the left.
- Click on Create credentials and then select OAuth client ID.
- If requested, configure the Consent screen by clicking on Configure Consent Screen. If you own a Google Business user you can go for Internal user type to allow only users belonging to your organization, otherwise an External use needs to be enabled.
- Fill all the app information, for External it is required to use a verification before production approval. Do not pay a lot of attention to this procedure since we are not going to use the application of OAuth consent created here for the rest of the procedure. Fill only the mandatory fields and leave the default values or empty fields for the others.
- If an External app is used, and you haven't published yet, you should add your user to the list of Test Users.
- If the Consent screen operation has been completed, go again on Credentials, click on Create credentials and then select OAuth client ID.
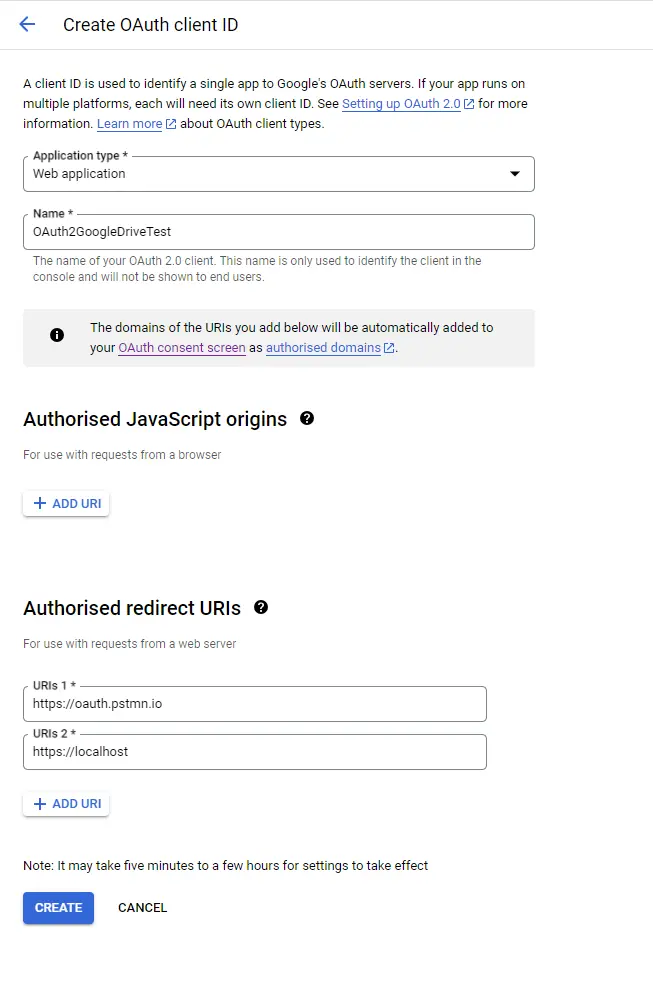
- Select Web application on the type of application.
- Name the OAuth 2.0 client just created and add the necessary authorized Authorised redirect
URIs. To complete this guide please insert the Postman redirect uri
https://oauth.pstmn.io/v1/callback. It will be useful later. Insert alsohttps://localhostfor Standalone Rulex Platform or your hostname in case of Rulex Platform cloud installation. - Click on Create and then obtain the Client ID and the Client
secret (you can download the
jsonwith this information inside by clicking on DOWNLOAD JSON).


Procedure to obtain the Refresh token and the Api key to be used inside Rulex Platform
- Go on the Credential tab by selecting it from the list on the left.
- Click on Create credentials and then select API key.
- The API key is going to be generated. To restrict its permissions, click on the three dots located on the right and click on Edit API key. In the provided panel you can restrict API key permissions.
- Open Postman application and configure a new Request.
- On the Authorization tab select OAuth2.0 authentication and look at the Configure
New Token section. Fill the fields with the following values:
• Callback URL: check on Authorize using browser.
• Auth URL:https://accounts.google.com/o/oauth2/v2/auth?access_type=offline&prompt=consent
• Access Token URL:https://oauth2.googleapis.com/token
• Client ID: the client ID of the newly created application.
• Client secret: the client secret obtained in the previous step.
• Scope:https://www.googleapis.com/auth/drive
- Click on Get New Access Token and insert the user Google credential to complete the login procedure. If the app of Consent Screen is not verified, you need to click Continue on the provided Security warning. If needed, insert the MFA to complete the login procedure. It could be possible the Postman application would be flagged as insecure application as well as the final redirect popup would be blocked by your browser. In the latter case, please allow it to proceed.
- At the end, the Postman request will be authenticated. The refresh token will be in the Postman answer. The duration of the refresh token can be controlled from your Google account settings.


With the Refresh token and the Api key obtained in the last procedure, you are now ready to connect to Google drive via Rulex Platform interface. Necessary information is:
- Api key
- Client ID
- Client Secret
- Refresh token

0 Comments
Recommended Comments
There are no comments to display.